We've updated this blog:How to Customise the WHMCS Client Area Template
Written by Alistair
In this blog post, we will be covering the basic aspects of how the WHMCS template system works, as well as how you can make a WHMCS template to match your existing website. This process is commonly known as WHMCS Integration.
The areas covered are:
1) Things you will need
2) Preparation
3) What files to edit
4) Making a WHMCS template to match your HTML template
5) IF statements
6) Troubleshooting with official WHMCS documentation
1) Things you will need
To get started, you will need the following things:
- A licensed copy of WHMCS software installed on your website
- An FTP client, such as FileZilla (FREE)
- A text editor, such as NotePad++ (FREE)
- A website template (HTML is the best choice for beginners)
- A basic working knowledge of HTML editing
2) Preparation
We will be using the Portal layout as the focus of our guide, in conjunction with the Free HTML template provided above.
To begin making an integration based on the Portal layout, you will need to download a copy of the template folder to your desktop. This can be done by using an FTP client, such as FileZilla.
At this stage, it is recommended that you rename the portal folder you just downloaded to something unique, for example, “template1”. You should then upload the folder via FTP to your WHMCS templates directory. You should now see all of the pre-loaded WHMCS template folders, as well as your new template folder, which we have called “template1”.
To view your new template without activating it in your WHMCS Admin panel, you can use the following URL:
https://www.yourwebsite.com/whmcs/index.php?systpl=template1
3) What files do I need to edit?
The WHMCS template front end (what your clients will see) is based on the Smarty template system. For those of you who are not familiar with what Smarty is – don’t panic. For the purposes of WHMCS template creation, all you need to know for now is that Smarty allows the use of user friendly variables and IF statements. Smarty makes other things possible too, but as this is a beginner’s guide, we will focus on the basics.
Let’s return to our desktop and take a look in the folder we called “template1”. As you will see, there is a folder for images, and a number of other files. The only 3 files you need to be concerned with for now are:
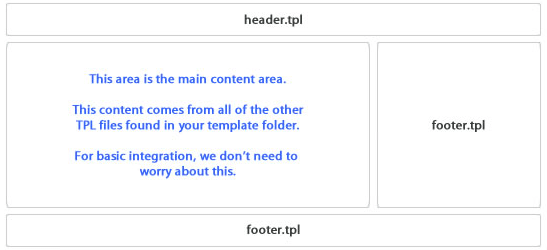
1) header.tpl – This file controls the top section of the WHMCS template
2) footer. tpl – This file controls the sidebar and bottom section of the WHMCS template
3) style.css – This file controls the CSS styling of the WHMCS template
This screenshot shows the typical sections of a website template in relation to the WHMCS template files they use:
4) Making a WHMCS template to match your HTML template
The first thing to do is to find a page of your HTML template that is suitable for WHMCS. Ideally, such a page would have a content area and a side bar, just like the Portal layout has.
As you can see from our free HTML template, the blank.html page would be ideal for WHMCS integration.
If you look at the HTML folder, you will see that all the files that the HTML template uses are located in there. Our WHMCS template is going to need these files, so let’s copy the “HTML” folder and all of its contents into our “template1” folder (the WHMCS template we are making), located on the desktop. You should also upload the HTML directory to the “template1” folder on your server:
https://www.yourdomain.com/whmcs/templates/template1/
You do not need to upload the actual HTML files – you just need to upload the CSS and image folders.
You should now be able to see these folders at the following locations:
https://www.yourdomain.com/whmcs/template1/HTML/css/https://www.yourdomain.com/whmcs/template1/HTML/images/
So now, your WHMCS template has its own copy of the CSS and image files used in the HTML template. This is particularly important if you are going to be using an SSL certificate with WHMCS.
Now let’s open the blank.html (HTML) file and the header.tpl file (WHMCS) in our text editor. You can delete everything in the header.tpl file, as we are going to insert the layout from our HTML template.
You will need to copy the top section of code from blank.html and paste it into header.tpl. We need to copy everything from the very top of the blank.html file, all the way down to where the individual page content is going to begin. If you remember from the picture above, the header.tpl only contains the top section of the template - it does not include any individual page content. In other words, we need to copy the HTML code up to the point that the content container has just begun - we want the content box, but we don't want any actual content in the header.tpl file.
Once copied, you can paste it into the header.tpl file.
In the case of our free HTML template, you would need to copy everything, starting at the top and going all the way down to:
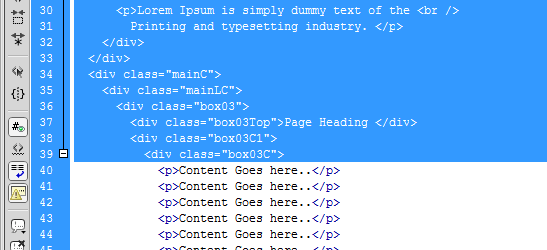
So now your header.tpl will have all of that code copied into it.
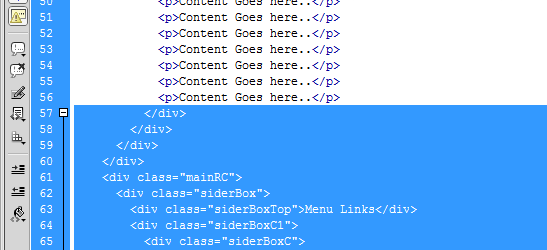
Let’s now open the footer.tpl (WHMCS) file and do the same thing – we need to copy the HTML code, starting from where the main content box ends. In the case of our free HTML template, you would need to copy everything below the last instance of:
Content Goes here..
We don’t want to copy “Content Goes here” – we want to copy everything below it and paste it into our footer.tpl file, overwriting all the existing footer.tpl content.
Let’s go ahead and save the header.tpl and footer.tpl files and upload them to our WHMCS template folder on the web server. You might be curious to see what it looks like at this stage, but it won’t look good as we need tell the WHMCS template where to find the HTML template image and CSS files.
Let’s go back to the header.tpl file that’s open in your text editor. You will need to make some changes to the section.
As you will see, the CSS file that our HTML template relies on has been linked to as follows:
So that WHMCS can locate it, we need to change the href tag to its correct location. This will be:
Our free template doesn’t contain images within the code itself, but if you are using a different template that does, you would need to tell WHMCS where to locate the images. For example, your template might have this:

All you would need to do is change it to this:

Now you can save the header.tpl and upload it to your template directory on your server. If you preview the WHMCS template in your browser now, it should look much better. However, there is still work to be done.
The final thing to do in terms of design is to apply the WHMCS style sheet and JavaScript calls. You can copy and paste the following code into the section of the header.tpl file:
{$companyname} - {$pagetitle}{if $kbarticle.title} - {$kbarticle.title}{/if} {if $systemurl}
{$headoutput}
{if $livehelpjs}{$livehelpjs}{/if}
This code tells your WHMCS template to load all necessary JavaScript and it also provides the CSS foundation for the WHMCS page content.
If you save the header.tpl file now and upload it to your server, you will probably see a few display issues. This is because the style.css of the Portal template is conflicting with your HTML template stylesheet.
So to resolve it, you need to remove all conflicting CSS from the WHMCS style.css file, and upload it to your server.
This should now result in a perfect WHMCS integration. All that remains to be done is to add the WHMCS navigation menu links. Due to the way the HTML template is structured, we will be placing the code needed into the footer.tpl file so that the WHMCS navigation links appear in the template side menu.
If you look at the code in the footer.tpl file, you should find the following:
All we need to do is replace it with this:
{if $loggedin}
- {$LANG.clientareanavhome}
- {$LANG.clientareanavdetails}
- {$LANG.clientareanavservices}
- {$LANG.clientareanavdomains}
- {$LANG.quotestitle}
- {$LANG.invoices}
- {$LANG.clientareanavsupporttickets}
- {$LANG.affiliatestitle}
- {$LANG.clientareaemails}
- {$LANG.ordertitle}
- {$LANG.logouttitle}
{else}
- {$LANG.globalsystemname}
- {$LANG.clientregistertitle}
- {$LANG.clientareatitle}
- {$LANG.announcementstitle}
- {$LANG.knowledgebasetitle}
- {$LANG.supportticketssubmitticket}
- {$LANG.downloadstitle}
- {$LANG.ordertitle}
{/if}
This code tells WHMCS to display 2 sets of menu links, depending on whether the user is logged in or not. If a user is logged in, they will be shown the main links, as well as links related to their client account. If a user is not logged in, the client account links will be hidden.
Now you can save the changes to the footer.tpl file, and hopefully, your WHMCS integration should be looking pretty good!
5) IF Statements
A great feature of the WHMCS / Smarty template system is that IF statements are incredibly easy to implement.
The most common one you will want to use is to tell WHMCS to display content depending on whether the user is logged in to their account or not. For example, WHMCS has the ability to display user account information. This is where you would want to use the following IF statement:
{if $loggedin}
Content here will be shown to users who are logged in.
{else}
Content here will be shown to everyone, unless the user is logged in to their account.
{/if}
It’s also useful for displaying a welcome message to users when they log in.
As you can see, you do not need to know any PHP to implement these IF statements.
6) Troubleshooting with official WHMCS documentation
If you’re not familiar with how to integrate WHMCS with a template, it’s likely that you’ll run into some problems along the way.
Your first port of call should always be the official WHMCS documentation – it’s there to be used!
Here are some links to useful WHMCS documentation for integration issues:
https://docs.whmcs.com/Client_Area_Template_Fileshttps://docs.whmcs.com/Template_Syntax
If you don’t find your answer in the documentation, a simple Google search should direct you to other places where you might find the answer.
If you still can’t find a fix for your issue, asking for help on the official WHMCS forums should be your next move. The WHMCS user community is a friendly bunch and has a wealth of experience with WHMCS.
Don’t forget, if you manage to fix the issue yourself, please update your forum post with the solution you used. It will probably be useful for someone else who has the same problem in the future.
I hope you have found this blog post useful and I wish you good luck with your integration.
Best regards,
Alistair
WHMCSThemes.comZumada Limited (UK)
Recommended Articles

Streamline Your Support Workflow with WHMCS Scheduled Actions
January 29th, 2025
Introducing the new PayPal Payments with Vault Technology
December 21st, 2023