In today's blog post, we're taking a look at client area themes and walking you through the process of creating a custom theme.
Client area themes
Even before the first code was ever written for WHMCS, we knew that extensibility and customisability were vital components for a successful business platform like WHMCS.
We cater to businesses all around the world, each with their own requirements and desires, and first and foremost in those requirements is being able to cutomise the look and feel that clients experience when signing up and managing their products and services.
For that reason, making the client facing areas of our product accessible, fully templated and easy to customise has always been a priority for us.
Creating a custom theme
The WHMCS client area is built upon a simple and easy to use templating setup.
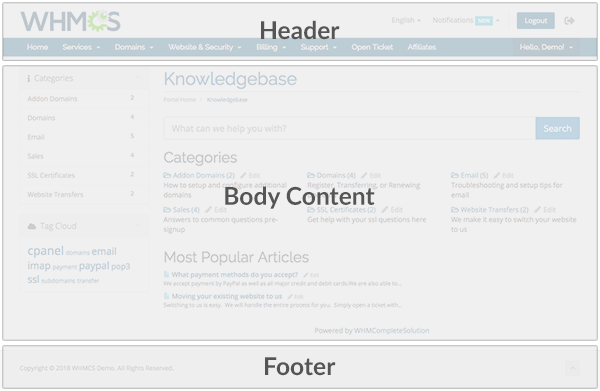
A typical page consists of 3 template files - a header, a footer, and the body content in between.
The header and footer template files are common to every page and act as a wrapper around the primary body content. This makes it incredibly easy to customise the overall look and feel of WHMCS simply by editing these two template files.
Customising the header and footer is a great place to start in order to create a seamless browsing experience for visitors to your website as they move between your frontend content and your WHMCS billing portal.
Here's our step-by-step guide:
1. Begin by finding a page of your website that is suitable to use as a basis for the template. Ideally, this should be a page that contains your header and footer, and an empty content area where the WHMCS body content will go.
2. Open that file and update any relative links to assets and resources with absolute url references. For example if the page contains a stylesheet include path such as "css/styles.css", update it to be "https://example.com/css/styles.css"
3. Create a new directory to house your new theme. It should be created within the 'templates' directory inside your WHMCS root directory. The name you give it should be unique, consisting of only letters and numbers, and be all lowercase. For example ~/templates/mycustomtheme/
4. Import a copy of the latest default theme's template files into your new custom template directory. At the time of writing this is the "Six" theme. The latest version of these files can always be found on our Github page at https://github.com/WHMCS/templates-six or simply copied from the ~/templates/six/ directory that ships with WHMCS.
!!! We recommend cloning this repo from Github where possible for easier ongoing maintenance. See our previous blog post for more information on this. !!!
5. Next, open your base page and copy everything from the top of the file up to where the content output should begin. Referring back to the picture above, the header.tpl only contains the top section of the template - it does not include any individual page content. In other words, we need to copy the HTML code up to the point that the content container has just begun - we want the content container opening, but we don't want any actual content in the header.tpl file.
6. Now paste that content into the header.tpl template file.
There are a number of important includes and outputs within the header template file that must be preserved for normal operation and compatibility with addons and extensions. Many of these are contained within the first few lines of the header.tpl template file as pictured below.
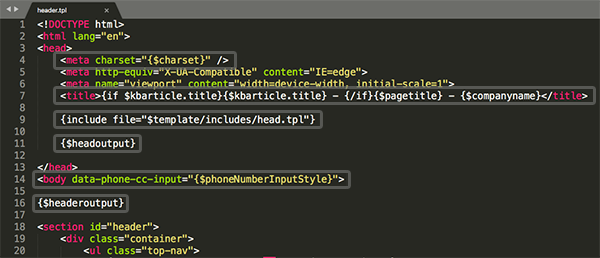
Here's a complete list of the required elements. Line numbers included in brackets are correct for Version 7.5.x and 7.6.x:
i. Meta charset (line 4) - required for multi-language to function correctly.
ii. Page title (line 7) - set dynamically based on the page being rendered/reviewed within the WHMCS client area.
iii. Head includes (line 9) - this include file includes a number of javascript and css libraries as well as defines javascript variables which are required for WHMCS to function correctly.
iv. Head output (line 11) - used by modules and addons to output content required in the section of a page. This should be included just before the closing tag.
v. Phone number input style (line 14) - used by WHMCS to determine how to render phone number inputs within the client area
vi. Header output (line 16) - used by modules and addons to output content required in the body of a page.
vii. Navigation menus (lines 102-131) - the links and navigation options are dynamically generated by the Menu system in WHMCS. This allows modules and addons to interact with and manipulate these areas of the client area dynamically. It is important to ensure you render both the $primaryNavbar and $secondaryNavbar menu items for user navigation. Customising of the output of these menu items can be done by editing the ~/includes/navbar.tpl template file.
viii. Sidebar menus (line 228 + footer.tpl line line 5) - similar to the navigation menus, the sidebar menus are generated dynamically by the Menu system in WHMCS. This allows modules and addons to interact with, manipulate and define their own additional sidebar content elements. It is important to ensure you render both the $primarySidebar and $secondarySidebar menu items. Customising of the output of these menu items can be done by editing the ~/includes/sidebar.tpl template file.
There are also a number of other optional elements which you may want to consider preserving or incorporating into your custom design for full functionality to be preserved:
i. Language chooser dropdown (lines 21-37)
ii. Account notifications popover (lines 40-60)
iii. The view cart button (lines 77-79)
iv. The email verification include banner (line 215)
7. Next, returning to your base page again, this time copy everything from the end of the content output container, to the end of the page.
8. Now paste that content into the footer.tpl template file. There are a number of important elements within the default WHMCS footer template that must be preserved for normal operation. They include:
i. Modal (lines 20-46) - a bootstrap modal container that is used by various functions of the client area
ii. Footer output (line 48) - used by modules and addons to output required content in the footer of a page. This should be included just before the closing