To safeguard your installation, data, and customizations, the best thing you can do is set up a testing and development environment before you upgrade WHMCS. Creating a testing and development environment will let you verify all of your customizations on the new version without ever touching your production systems. It's also useful anytime you write modules, themes, or other customizations for WHMCS. You'll be able to find any problems quickly, without the risk of your customers finding them first.
It's always a good idea to do this before you upgrade your production system. Regardless of your installation's level of customization, you should also be sure to perform basic steps like creating a full backup and checking our release notes for changes.
Get set up
Your testing and development environment will need to meet the same system requirements that you'd need for a production installation. For the most accurate testing, this should be identical to your production setup. Experienced or "power" users can do all of this locally, too, as long as the requirements are met. A local installation can be faster and easier to work with if you're already comfortable in this kind of development environment. Before you continue, make sure to reach out to WHMCS Customer Service to obtain a development license. Even local installations won't function without a WHMCS license. You can get one free development license for every active license you purchase directly from whmcs.com. If you purchase your WHMCS license through a reseller (for example, your web hosting provider) you will need to buy the license.
All the addons for your paid license will also be available with the associated development license (with the exception of Live Chat). Installations using this type of license must be private and return a Forbidden Error or login prompt if accessed.
Duplicate your WHMCS installation
For the most accurate results, test an installation that's identical to your existing production installation. This will ensure that you're working with the same data and configuration, and will help you catch small details that might otherwise be missed. There are several methods to duplicate your installation. If you're using cPanel, it's easy to copy your WHMCS installation in the File Manager interface. Just log in to cPanel and go to Files >> File Manager. Select the folder for your production installation and click Copy. Then, enter the new location, which should be the location of your development installation.

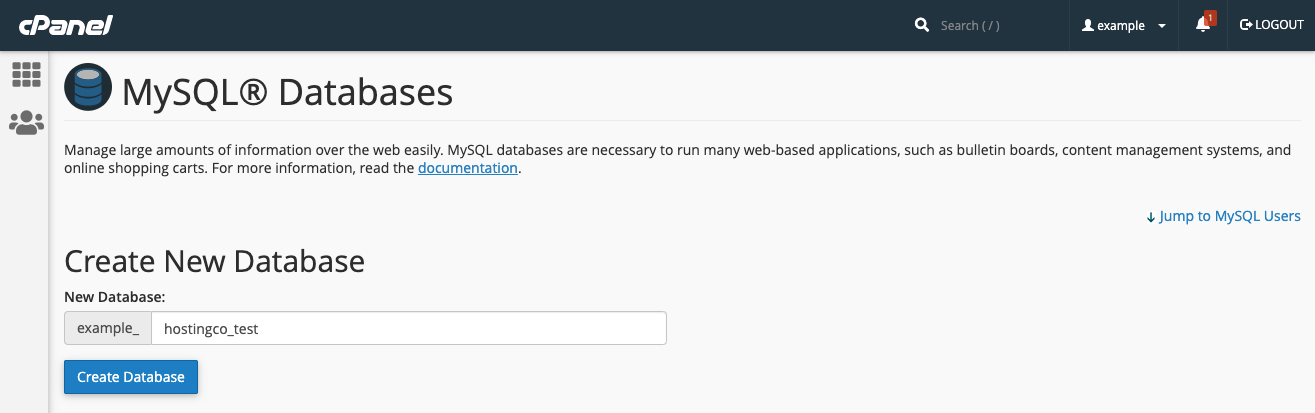
The data WHMCS operates on can be just as important to this process as the installation itself, so it also needs to be duplicated. This means creating a second database, exporting the existing database, and then importing it to your new database. Like duplicating the installation, there are several ways to do this.
If you're using cPanel, for example, you can use the MySQL Databases interface to create the new database, and then use phpMyAdmin to export the existing data and import it into your new database.
While you're performing these tasks, make sure to password protect your new testing installation's directory. In cPanel, you can do this in Files >> Directory Privacy. This ensures that you continue to meet the requirements for your developer license.
Make updates
You'll need to make a few updates to create a functional testing environment. Make sure to update the system URL in the General tab at Configuration > System Settings > General Settings to use the new testing environment's URL. If you can't access the installation to do it in the interface yet, you can use this MySQL command or update the value manually in phpMyAdmin: UPDATE `tblconfiguration` SET value ='https://www.example.com/whmcs/' WHERE setting='SystemURL'; To prevent sending test mail from your development installation to your real customers, we recommend that you use a service like Mailtrap.io. It can catch outgoing emails and ensure they aren't delivered to real recipients. You may also want to set your payment gateways and domain registrars to test mode and disconnect from your production servers.
If you deviated from the processes above, you may also need to check for or reapply any customizations on your system. That includes any files that you've moved or customized, custom themes, modules, and other items that might have reverted to their default state when you duplicated your installation.
Testing a new version
Once you've copied your production installation and have confirmed that everything's working as expected, it's time to upgrade WHMCS. We recommend that you use the Automatic Updater for this, since it streamlines the process for you. You can find out more about the upgrade to WHMCS 8.0 here. After upgrade, go through WHMCS and exercise all of the features and functions that you use most. Check both the client and admin areas, and make sure to place several orders for your various products. Walk these test orders through every step of the process, including marking them as paid and ensuring correct provisioning.
Of course, you'll want to pay special attention to your customizations and their functionality. Monitoring Configuration > System Health will help alert you to any problems or incompatibilities. The Cron Job Activity Report email will confirm whether your automation tasks are successful.
Once you're satisfied with the results, you'll be able to proceed to upgrading your production installation. And remember, you can always contact us if you run into problems.