One of the awesome features in WHMCS's support system is the ability to reply to and, if enabled, open support tickets through email. Tickets go to the correct department every time, and both WHMCS admins and your customers get to enjoy an easier support ticket experience. All of this is made possible through two similar features: email piping and email importing.
Email Piping and Email Importing
In WHMCS, email piping uses a system of email forwarders to direct, or "pipe," email sent to a certain address to WHMCS. The Support Departments interface provides a simple pipe command for this. You can copy and paste it into your control panel's email forwarding interface for easy setup. Because of this, we typically recommend using email piping if you use cPanel, which includes an easy way to set up email forwarders. We also recommend that you pipe in email from the same domain that WHMCS is installed on. In contrast, email importing goes directly to the source. It uses a password or OAuth 2.0 credentials to authorize access to the department's email address. The Support Departments interface includes a cron command to import the email from that account. We recommend this method for anyone who isn't using cPanel, is importing email from multiple domains, or wants to use OAuth.
In WHMCS 8.1, we augmented the existing support for POP3 and IMAP to also include mail importing through Gmail using OAuth 2.0.
OAuth 2.0
One of the constants of the internet is that technology is constantly evolving. As part of this, some mail providers have announced future requirements for OAuth 2.0 or are already requiring it. It's considered more secure than traditional username-and-password authentication and gives you more control over access to your systems. Rather than only performing authentication, which requires proving that you are who you say you are, OAuth also performs authorization for the application you're using. When you set up mail importing, you'll enter a Client ID and Client Secret from Google (your "client credentials") into WHMCS instead of your Gmail login. WHMCS uses that information to authenticate with Gmail and request authorization. When it's time for WHMCS to import email, which is scheduled with a cron job, a connection token will be used, allowing WHMCS to perform the necessary actions without having stored your actual username and password.
You can revoke authorization with just a few clicks in the Google Cloud Console. For example, if for some reason your credentials become compromised or you need to change them, using OAuth can save you time and effort by removing the need to reset the password separately for each application that uses it. All you need to do is revoke and then restore the permissions.
Because major mail providers have announced their requirements, many businesses are making the switch, updating systems to use OAuth now rather than later. As the systems you use update to allow it, it's a good idea to follow suit and be ready for the changes to come.
Setting Up Mail Importing in WHMCS
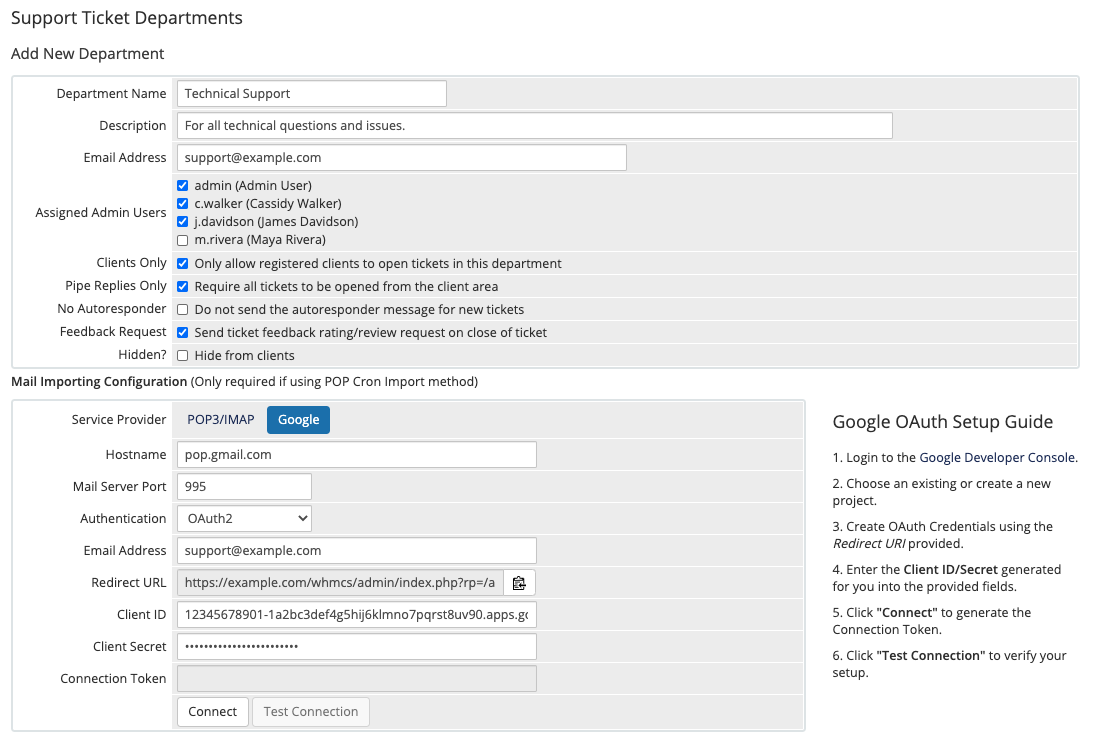
Setting up mail importing using OAuth requires a few additional steps. Before you can configure your support department in WHMCS, you will need to create the department's Gmail address and create an app for it in the Google Cloud Console. This will require a Redirect URL, which you can find during the process of creating or editing a support department in WHMCS (see below). 
Then, while you set up mail importing in WHMCS, you will need to use the Client ID and Client Secret from your app to configure authentication. When you connect WHMCS with Google, a window will allow you to choose the right account. Set up the importing cron job and you'll be ready to go.
Get Started
To start using OAuth 2.0 with mail importing, you'll need to upgrade to WHMCS 8.1. In addition to this feature, you'll get access to other great changes, like the new Twenty-One theme for the WHMCS Client Area and automated user deletion. To upgrade, download the new version here or, to use the automatic updater, go to Utilities > Update WHMCS in the Admin Area. You can find more information about setting up mail importing in Email Importing and Setting Up POP3 Importing with OAuth via Google.